

If you’re a car owner, chances are you’ve encountered the pesky issue of stone chips on your vehicle’s exterior. These tiny dents and scratches caused by flying debris can be unsightly and detract from the overall appearance of your car. Fortunately, there are effective ways to repair and hide stone chips, restoring your car’s pristine look. This article will guide you through improving stone chips effortlessly, ensuring your vehicle stays in top shape.
Are you tired of those unsightly stone chips on your car’s exterior? Don’t worry! We’ve got you covered with an effortless solution to repair and hide those annoying dents and scratches. In this article, we’ll guide you through the step-by-step process, ensuring your car looks as good as new in no time.
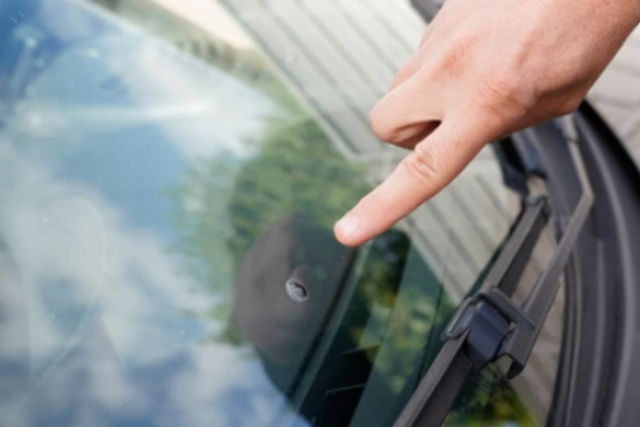
Understanding Stone Chips
Before we delve into the repair process, we must understand what stone chips are and how they can affect your car’s exterior. Stone chips occur when small rocks, gravel, or other debris hit the surface of your car at high speeds, leaving behind tiny dents and scratches. These chips are most commonly found on the front hood, fenders, and bumper, as these areas are more exposed to oncoming debris while driving.
Gathering the Necessary Materials
To successfully repair stone chips, you must gather a few materials beforehand. Here’s a list of items you’ll require:
Touch-up paint
Make sure to get the exact color match for your car. You can find this information in your car’s owner’s manual or by contacting the manufacturer.
Paintbrushes
Choose brushes with different sizes to accommodate various chip sizes.
Sandpaper
Opt for fine-grit sandpaper to smooth out the surface.
Masking tape
This will help protect the surrounding area from accidental paint application.
Microfiber cloth
Used for cleaning and drying the surface.
Clear coat
This provides a protective layer and enhances the finished repair.

Step-by-Step Repair Process to Hide Stone Chips
Now that you have all the necessary materials, let’s dive into the step-by-step repair process for stone chips on your car:
Step 1: Clean the Affected Area
Start by thoroughly cleaning the area surrounding the stone chip. Use mild car detergent and water to remove dirt, grime, or debris. Pat the area dry with a microfiber cloth to ensure a clean surface for the repair.
Step 2: Assess the Damage
Carefully examine the stone chip to determine its depth and size. This assessment will help you choose the appropriate repair method. For example, minor chips that haven’t penetrated the primer layer can be fixed using touch-up paint, while more bottomless chips may require additional steps, such as filling and sanding.
Step 3: Apply Touch-Up Paint
If the minor stone chip hasn’t reached the primer layer, it can be repaired using touch-up paint. First, shake the paint bottle well to ensure proper mixing, then apply a small amount of color directly to the chip using a fine-tipped brush. Make sure to fill the entire chip evenly and avoid excessive paint application.
Step 4: Let the Paint Dry
Allow the touch-up paint to dry according to the manufacturer’s instructions. This usually takes around 24 hours. The repaired area is protected from dirt, dust, and moisture during drying.
Step 5: Smooth the Surface
Once the paint is dry, use fine-grit sandpaper to gently smooth the repaired area’s surface. Be careful not to sand too aggressively, damaging the surrounding paint. Instead, aim to achieve a smooth and seamless finish.
Step 6: Apply Clear Coat
Apply a clear coat to provide an extra layer of protection and blend the repair with the rest of the car’s paintwork. This clear coat will ensure the repaired area matches the gloss and shine of the surrounding paint. Use a brush or aerosol to apply an even clear jacket, following the manufacturer’s instructions.
Step 7: Inspect and Finalize
After applying the clear coat, inspect the repaired area for imperfections or unevenness. Then, repeat the sanding and transparent coat application process until you achieve a seamless finish. Take your time during this step to ensure the best results.
Step 8: Wax and Polish
Once you’re satisfied with the repair, it’s time to give your car’s exterior a final touch-up. Wax and polish the entire car surface to enhance its shine and protect the paintwork. This step will help blend the repaired area further with the rest of the car, giving it a uniform and polished appearance.

Situations When DIY Stone Chip Repair Isn’t Recommended
While do-it-yourself (DIY) stone chip repair can be a cost-effective option in some cases, there are situations where it isn’t recommended. Here are a few scenarios where DIY stone chip repair may not be the best approach:
Extensive Damage
If the stone chip has caused significant damage to your vehicle’s paint or bodywork, attempting a DIY repair may not yield satisfactory results. In addition, large or deep chunks that have exposed the metal or underlying layers of the vehicle may require professional expertise to restore correctly.
Lack of Experience:
To achieve optimal results, stone chip repair requires skill and experience. If you have yet to gain prior experience with automotive maintenance or painting techniques, it’s advisable to seek professional assistance. Improper techniques or mismatched paint can make the repair more noticeable and may lead to further damage.
Advanced Paint Systems:
Modern vehicles often use advanced paint systems, including multi-layered and clear-coat finishes, to achieve a high-quality and durable paint job. Unfortunately, repairing stone chips in such paint systems can be challenging without the proper tools, materials, and knowledge. DIY attempts may result in color mismatches, uneven textures, or damage to the existing paintwork.
Warranty Concerns:
If your vehicle is still under warranty, attempting a DIY stone chip repair might void the warranty coverage. Manufacturers usually have specific guidelines and requirements for paint repairs, and deviating from those guidelines may result in a loss of warranty protection. It’s best to consult the warranty documentation or contact the manufacturer or authorized service center for advice.
Lack of Proper Equipment:
A seamless and professional stone chip repair often requires specialized tools and equipment. Unfortunately, these tools, such as air compressors, spray guns, and paint mixing systems, may not be readily available to DIY enthusiasts. However, the proper equipment makes achieving the desired finish and durability easy.
Time and Effort:
Stone chip repair can be time-consuming, particularly if you’re unfamiliar with the techniques. It requires thorough surface preparation, paint mixing, application, and curing time. If you have limited time or prefer a quick solution, having a professional handle the repair may be more convenient.
In any of these situations, it’s recommended to consult a professional auto body shop or a certified technician who can assess the damage and provide appropriate guidance or perform the necessary repairs.

Bottom Line
Repairing stone chips on your car doesn’t have to be a daunting task. Following the step-by-step process outlined in this article and using suitable materials, you can effectively hide and repair those unsightly dents and scratches.
Remember to take your time, pay attention to detail, and aim for a seamless finish. Then, with a little effort and patience, your car will regain its pristine appearance, making you proud to hit the road again.
FAQs
Can I repair the stone chips on my car myself?
Yes, you can repair minor stone chips on your car using touch-up paint and following the step-by-step process outlined in this article. However, for more extensive damage or if you’re unsure about the repair process, it’s recommended to consult a professional auto body shop.
What causes stone chips on cars?
Stone chips are caused by small rocks, gravel, or debris hitting the car’s surface at high speeds. These chips are commonly found on exposed areas like the front hood, fenders, and bumper.
How long does the repair process take?
The repair process can take a few days, mainly due to drying and curing times for the paint and clear coat. Therefore, to achieve the best results, allowing each layer to dry properly is crucial before proceeding to the next step.
Will the repaired area be completely invisible?
While the repair process aims to make the stone chip less noticeable, it’s essential to note that achieving an invisible repair is challenging. However, with proper techniques and attention to detail, the repaired area can blend seamlessly with the rest of the car’s paintwork.
Can I prevent stone chips from occurring?
While preventing stone chips entirely is impossible, you can take steps to minimize the risk. For example, consider applying a protective film or clear bra to vulnerable areas of your car’s exterior, such as the front hood, fenders, and bumper.
Additionally, maintaining a safe following distance and avoiding driving behind trucks or vehicles carrying loose debris can help reduce the chances of stone chips.